


Quickly test tower tweaks directly in this build view. Changes are not saved.
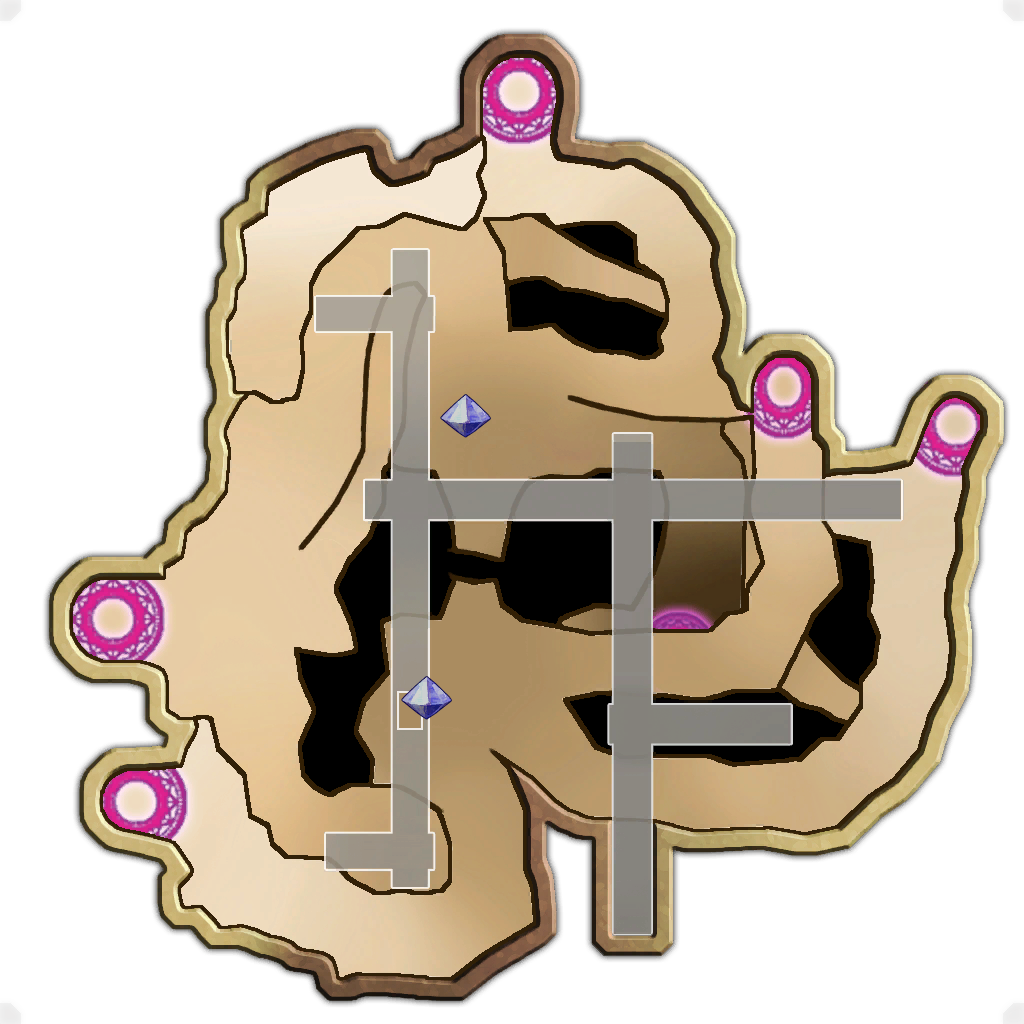
Click on a numbered hint marker on the map to zoom and highlight nearby towers. Double click on map to reset zoom.
No hint selected.
Highlight placed towers (Chrome limitation applies)


Build Status: Public
Difficulty: Ruthless
Game Mode: Campaign
Hardcore: No
Ruthless: Yes
AFK Able: No
Mana Used: 0
Mana to Upgrade: 0
More Builds from Lytaneous
6k TB - Towers Main Stat 6k-6.5k
Step 1) Start with Hermit - Gather Chests, drop Pylon Tower and Mushroom Spore only. (Hint: Make sure to give yourself enough room so that 2 more towers placed to the south aren't going to clip over the bridge to avoid future ogre snot in final wave)
Step 2) Swap to Monk to drop 2x Aura Stacks (Hint, my aura monk sucks so I actually have to drop 1 pylon on each aura stack in Step 1 to get them to reach the actual pylon I'm going to upgrade. After I drop the aura stack I verify they can reach the primary one and then sell it) The reason this is important is because you want your stack to reach the about 1/3 of the upper walkway for the north spawner, and the other stack to reach the lowest spawner (middle of map) while still covering the the southern path where the ogres and flyers come from. For the north tower stack, there is a small pointy rock cropping you can place all 3 auras on. The south one is just in the middle of the path.
Step 3) Swap to Guardian and drop Holy Bulwark on top of Hermit Towers
Step 4) Swap to EV and do the 4DU buff beam and reflects. The reflects around the towers create an open ended triangle where the Holy Bulwark touches the corners
Step 5) Swap to Warden and drop 3 Shroom Pits, and 2 Cloud Towers. One pointed directly at the North Spawner and the other angled towards the south aura stack (important)
-Send 1 upgrade on your buff beam and pull in your TB and Upgrader (start wave)
Step 6) Gather mana/Swap to Hermit to place the Forest Golem just behind the Holy Bulwark
Step 7) Swap back to Warden and place the remaining 5 Wisp Towers
---- do waves and upgrade ----
For the final phase, depending on what items you are farming, you can are going to "sacrifice" your toons to buy TB uptime.
Place one character on the top floor at the upper chest where Hint (4) is located. Recommended to stand by, but do not open the chest. This can cause the boss to get stuck/hover in range of your towers for ~15 seconds which will help with the kill.
Place second character on the bottom floor of Hint (4) marker standing dead center in the scaffolding support structure
Place third character standing on the empty ore cart directly above the tower stack. The boss can also charge this character and get stuck on the ore cart helping with tower uptime.
Finally, hide your tower booster behind the Idol against the stone wall at Hint Marker (5). Keep boulding tossing and watch the boss closely. When he turns sideways pay attention to where the metoers go. Never ever go near your tower stack. If you are lucky, by the time the boss nukes characters 1 - 3, it'll almost be dead and you don't have to place chicken with the bosses' lava boulders. If you are targeted, immediately start the path created by the green arrows. This will lead you up the safest route where the least mobs will be thanks to the aura stack just barely reaching the nothern spawner. You can run full speed in the loop to confuse the boss and get back into position. Usually 1 or 2 loops and the boss dies with my current gear.
Note: I have had 2 kills where something went horribly wrong (because I'm bad) and the towers finished the boss from 400mil to dead with all my character dead. This is why I use the Holy Bulwark + Forest Golem because the towers can take some serious abuse before going down because of the dual healing and Hermit Pylon health boost.