


Quickly test tower tweaks directly in this build view. Changes are not saved.
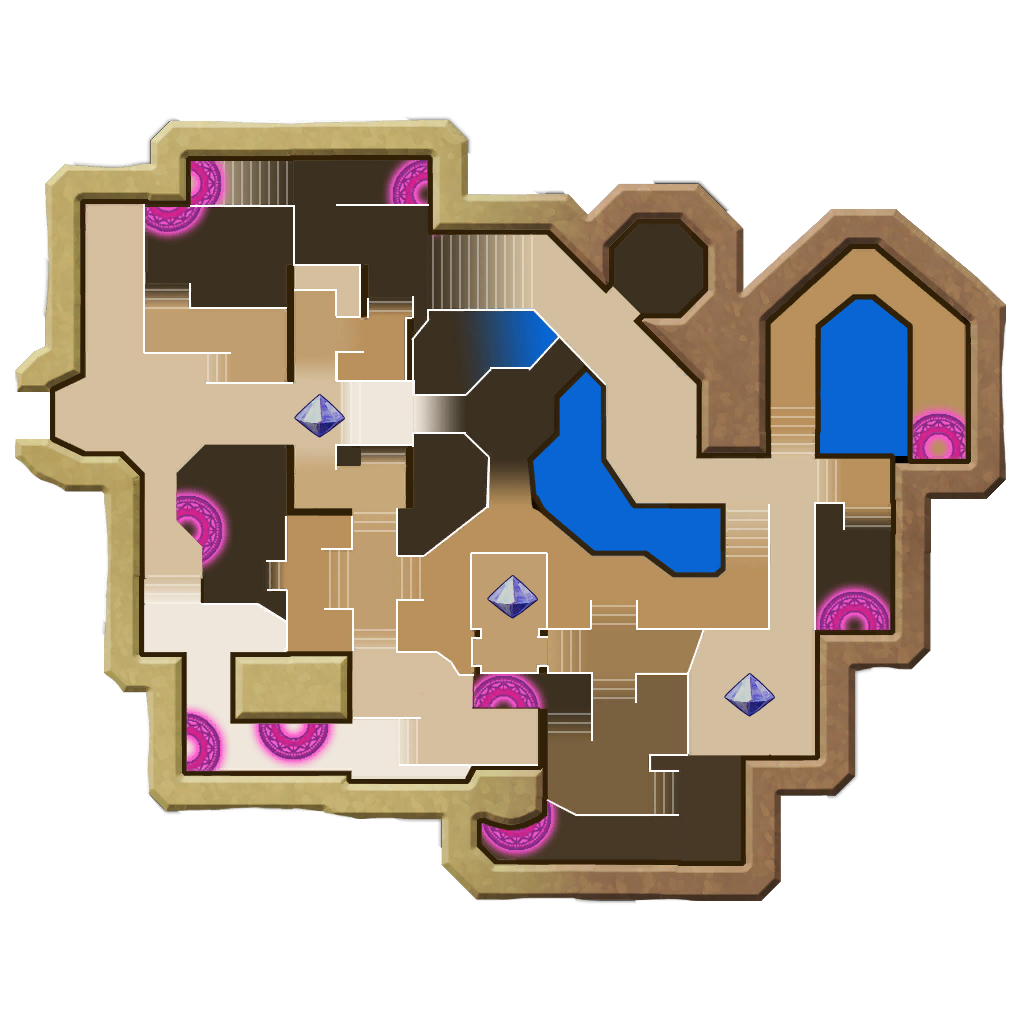
Click on a numbered hint marker on the map to zoom and highlight nearby towers. Double click on map to reset zoom.
No hint selected.
Highlight placed towers (Chrome limitation applies)


| Name | HP | Damage | Range | Rate |
|---|---|---|---|---|
 Huntress Huntress | 3200 | 8300 | 4700 | 4100 |
 Monk Monk | 4300 | 5200 | 7700 | 3600 |
 Warden Warden | 3500 | 8800 | 4500 | 4300 |
 Guardian Guardian | 8900 | - | 4100 | 4200 |
Build Status: Public
Difficulty: Nightmare
Game Mode: Pure Strategy
AFK Able: Yes
Mana Used: 0
Mana to Upgrade: 0
More Builds from Sleepy
High Warden stats are needed. I put in the stats I used.
4 Characters:
- Summoner (Huntress/Monk guardian pets) at the north end of the Hint 1 buff beam (so it is off the tower stack in order to avoid buffing the Ensnare Aura over the other auras)
- Summoner (Huntress/Monk guardian pets) between Hint 2 and 3
- Builder Warden behind the Defender's Forge (southeast of the southeast crystal)
- Builder Trapper/Huntress behind the Defender's Forge
The Hint 1 tower stack and buff beam are on the doorway/entryway overhang thing. The Ensnare Aura in this area is on the same level/elevation as the crystal, but on the "pillar" instead. The Strength Drain and Electric Auras are on the lower ground and hugging east of the other north "pillar".
The Blue Arrows are the directions of the Cloud Towers.
The Green Arrows are the directions of the Angry Blossoms.
Build with your Huntress before your EV as you'll otherwise have issues placing the top left Inferno Traps.
Build with your Guardian before you build with your Warden as you will want the Owl Nests down first for building ease.
If you have a lot of range on your Aura Monk, you'll probably want to respec the level up stats from TRange into TDamage instead. You don't want either of the Ensnare Auras to overlap on the spawn points.
During the 1st Combat Wave, have the Hint 1 Summoner out with your upper.
Changelog:
- v1.2 05/10/2026 - Removed "Hint" indicators for the trap stacks (Hint 1 and 5). Adjusted other "Hint" indicators to make up for it; Hint 2 -> Hint 1, Hint 3 -> Hint 2, and Hint 4 -> Hint 3. Removed Proximity Mine and south Reflect Beams from around Hint 2's tower stack. Removed Gas Traps. Added Gas Traps to new locations to remove Wasp hiding in Djinns RNG, making the build more tower stat friendly. Replaced Hint 1's Sludge Launcher with an Angry Blossom. Added another Inferno Trap to the northwest so that it covers the flyers coming towards the crystal while still being Buff Beamed. Changed the most northwestern Buff Beam and Holy Bulwark position so that the new Inferno Trap can be buffed, while still drawing aggro from all monsters. Removed build screenshot.
- v1.1 05/09/2026 - Changed bottom right stack's Buff Beam from 4du to 5du. Removed 1 Owl Nest from bottom right stack. Removed Reflect Beam from top left stack. Added a Sludge Launcher to top left stack. Moved a no longer down-sized Hint 2 Ensnare Aura to be on the same level as the crystal, but on the "pillar". Changed Hint 2 Summoner positioning to be on the north side of the Buff Beam. Added an Angry Blossom to bottom right stack. Added a Proximity Mine slightly south of the bottom right stack. Adjusted bottom right stack's "top" Reflect Beam. Changed build screenshot to reflect changes.