


Quickly test tower tweaks directly in this build view. Changes are not saved.
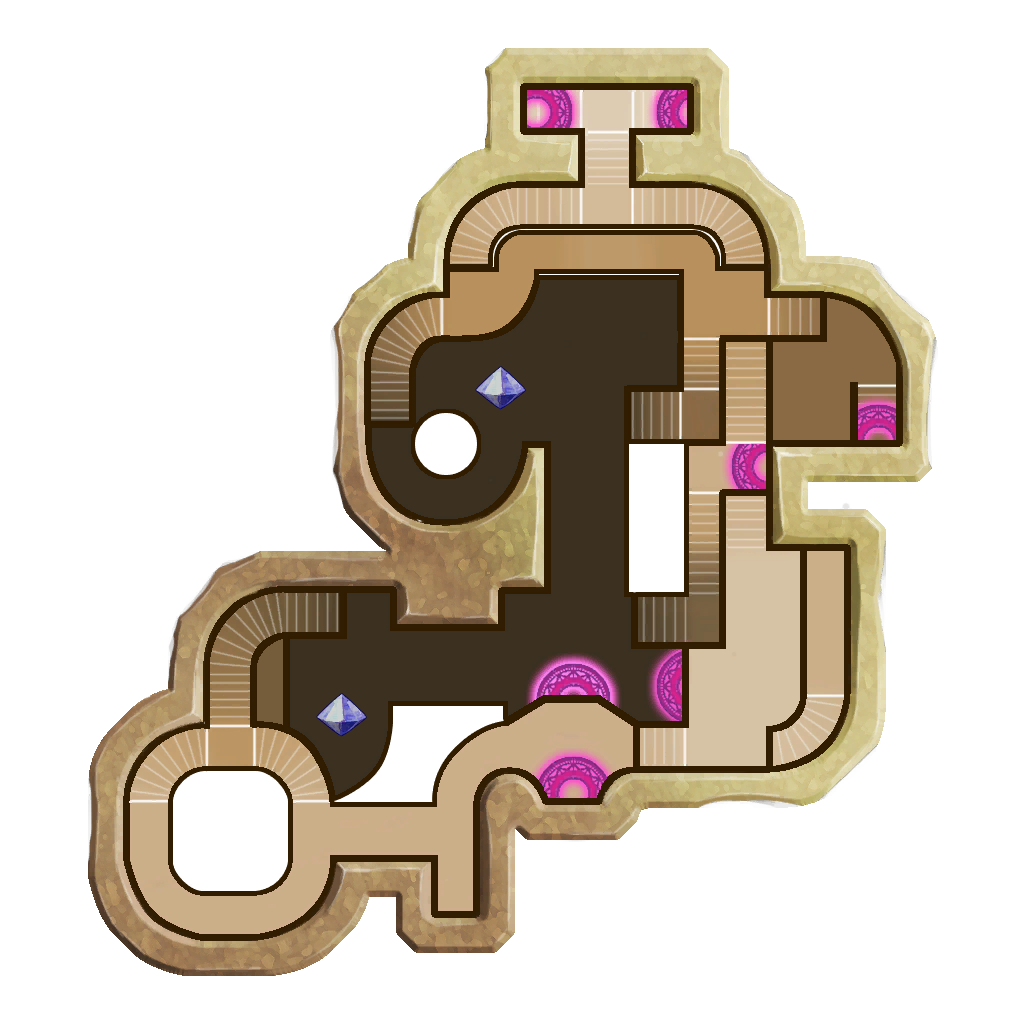
Click on a numbered hint marker on the map to zoom and highlight nearby towers. Double click on map to reset zoom.
No hint selected.
Highlight placed towers (Chrome limitation applies)


| Name | HP | Damage | Range | Rate |
|---|---|---|---|---|
 Squire Squire | 3500 | 7800 | 4000 | 4000 |
 Huntress Huntress | - | - | 7000 | - |
 Monk Monk | 3000 | 2500 | 7900 | 3000 |
 Hermit Hermit | 3700 | 8100 | 4400 | 2900 |
 Warden Warden | 3100 | 7700 | 4600 | 3900 |
Build Status: Public
Difficulty: Any
Game Mode: Pure Strategy
AFK Able: No
Mana Used: 0
Mana to Upgrade: 0
More Builds from Nick The Guy Who Mis
Build video link: https://youtu.be/LraCqjuVIWE
The video is just for placements and the TB Monk location. (Don't judge Steam recording quality <3)
This build averages 30 minutes of combat time and around 5 minutes to build/Upgrade. Took me a while to make, but it's fast and consistent!
Note 1: This build requires 7.5k Aura range and similar builder stats for Gold enemies. For waves: Warden Builder (Or Jester/Upgrader), 2 Summoners with Monk and Huntress on each stack (Required), TBooster on Hint 3
Note 2: "x" means multiple builders are stacking in the same spot. To achieve this, have the builders out on ALT's and pre-place towers (See Video)
Note 3: Black dotted lines are the outer range of a turret's yellow LOS
Note 4: Tower Stack placement and direction tight to stay within the Tower Boost range, and copter spawn LOS!
Build Description:
N/E STR Drain on the boxes below the ramp N/E of the spawn
South STR Drain on the boxes S/W of the lower spawn
Hint 1: Buff Beam (4DU) on the outer ledge closest to the bridge, directly West of the Southernmost tip of the Spawn Door, then off the ledge into your STR Drain.
(3 x Builder ALT's out required. Stack on the ledge as close to the bridge as possible)
1 S.A.M. x 1 Shroom Pit x 1 Wisp Den x 2 Cloud Towers x 1 Mortar.
S.A.M. and Cloud Towers Face Due North with the Eastern LOS range along the dotted line (goal is to not shoot the spawn door and only focus on the North spawn and copters)
Mortar faces N/E covering the full spawn door.
Hint 2: Buff Beam (4DU) upper level starts from the middle of the rectangular box closest to the ledge edge, going West to the nearest wall nook.
Mortar is placed on the wall nook, covering the Upper spawn and the West bridge.
(2 Builders are used, all placed as close to the North edge as possible)
1 S.A.M. x 1 Wisp Den x 1 Shroom Pit x 1 Sludge Bomb x 1 Cloud Tower
All of these face due West, with the Southmost edge of the LOS touching the dashed line.
Hint 3: Place an archer on the upper castle nook, jump on the archer with your Tower Booster, jump across to the upright bridge support. The Tower Booster Must Stand in the North West Corner of the bridge support to hit both tower stacks, shooting into the lower spawn.
This build spawn kills the gates with mortars, and the North Web wall + Clouds kills everything before it rounds the corner.
The Golem Aggro's the South West Spawn Ogres and Machines, while the elevated tower stacks kill copters before they drop ogres.
If you made it this far and tried it out, shoot it a like! Thank you!