


Quickly test tower tweaks directly in this build view. Changes are not saved.
Click on a numbered hint marker on the map to zoom and highlight nearby towers. Double click on map to reset zoom.
No hint selected.
Highlight placed towers (Chrome limitation applies)


| Name | HP | Damage | Range | Rate |
|---|---|---|---|---|
 Huntress Huntress | - | 8000 | 4600 | 4100 |
 Monk Monk | - | - | 8700 | - |
 Warden Warden | 3500 | 8800 | 4500 | 4300 |
 Guardian Guardian | 8400 | - | 3900 | 4100 |
Build Status: Public
Difficulty: Nightmare
Game Mode: Pure Strategy
AFK Able: Yes
Mana Used: 0
Mana to Upgrade: 0
More Builds from Sleepy
3:44 build time for this disgustingly huge map.
To do this with less range on your Monk, remove the most eastern Reflect beam at the Hint 3 area and use a 5du Buff beam for Hint 4. You'll just need to pay attention between waves to the eastern EV wall as it may or may not take damage.
I just go waves 28 through 35 for the pets and weapons while armor farming, but you can start on earlier waves if you wish to.
See the images below at the end for how the towers and characters are placed.
For the AFK characters, we'll be using 3 Summoners (Monk/Huntress guardian pet combo) and your builder Warden.
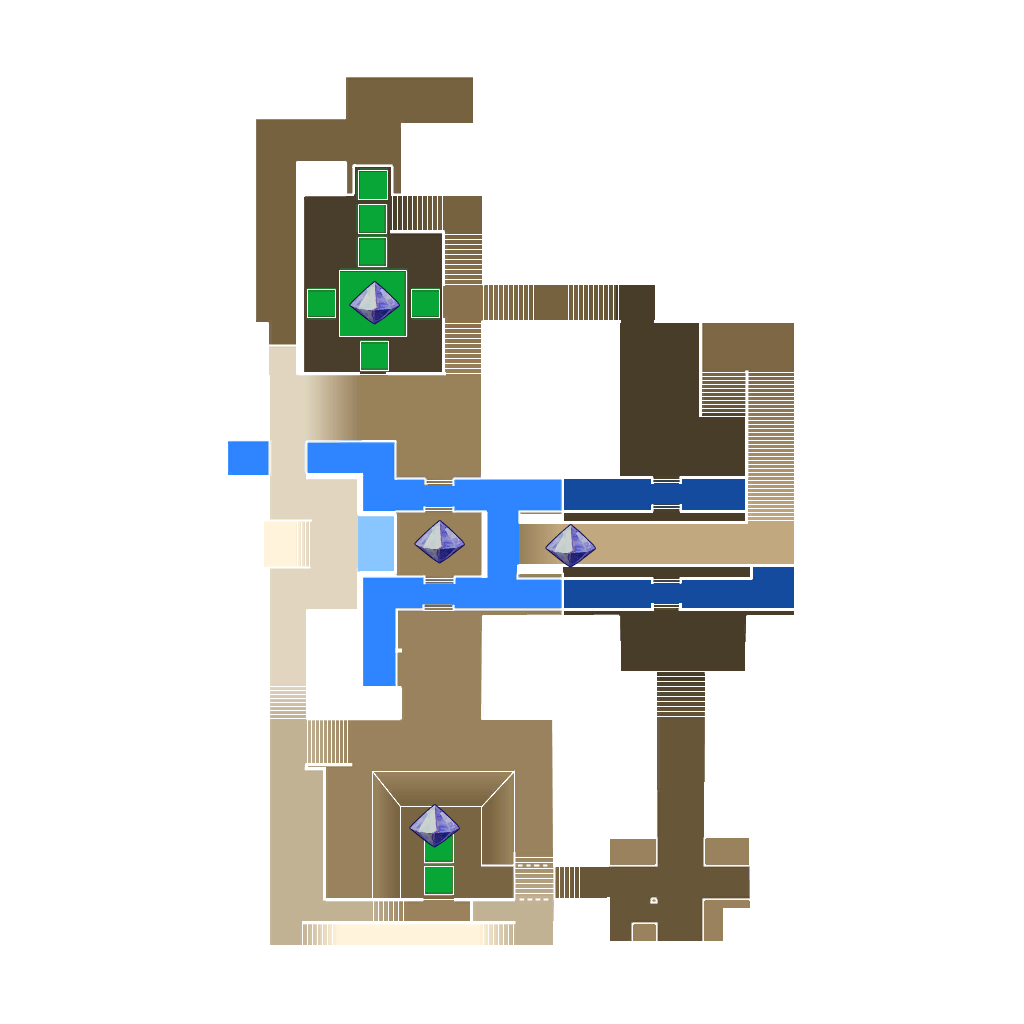
Hint 1
- Place a Summoner here, but off to the north or south side of the stack for convenience sake.
- The up and down movement of the platform can shove your Summoner off the stack, which can end up forcing your Summoner off the platform between waves.
Hint 3
- Place a Summoner here, but on the north ledge. The Summoner should be buffing the Hint 2 stack as well.
- This position protects from any Harbingers coming out of the west spawn that immediately divert to the north and decide to go towards Hint 3. They always end up entering through the south waterway and not the north waterway, which is why there is an EV wall south of Hint 2 to prevent the Harbinger from entering the tower stack space.
- I have not figured out the rhyme nor reason for what causes the Harbingers to go north rather than south. Most runs, they never go north. The EV wall is just insurance for whenever the fluke happens. I've tried multiple different builds for this bridge area, but the Harbingers always still come for Hint 3 at times.
- This position protects from any Harbingers coming out of the west spawn that immediately divert to the north and decide to go towards Hint 3. They always end up entering through the south waterway and not the north waterway, which is why there is an EV wall south of Hint 2 to prevent the Harbinger from entering the tower stack space.
- All towers are pointed towards the east as shown by the black arrow.
- The Ensnare Aura is the only aura here. There is no Strength Drain aura.
- The east EV wall is placed east of the Ensnare aura to prevent the east spawn Harbingers from getting too close to your Summoner.
- 1 Reflect beam protects the east EV wall, while the other reflect beam is behind the wall to protect the stack
- The ogres that reach the wall will throw their balls past the Reflect beam protecting the wall, which will hurt the stack without the 2nd Reflect beam.
Hint 4
- Place a Summoner here, but north and against the corridor's eastern wall.
- This will let the stack be buffed while also protecting the Summoner from Harbingers.
- Place your Warden somewhere north of your Summoner to keep them safe.
- Place the Shroom Pit a bit closer to the Summoner than the other towers.
- This ensures that the Shroom Pit gets the monk guardian pet buff so that it can reach any mobs that get stuck at the southeast spawn area.
- Blue arrows show the Cloud Towers' directions.
- Green arrow show the Sludge Launchers' direction.
- The Sludge Launchers are placed so they cover the west stairs while also covering the maximum angle as much as possible for the south and east directions.
- The "south" Reflect beam is off-center to protect from helicopter ogres that dropped from the south and from the ogres that come from the east stairs.
Trap Stack
- Place the Inferno trap slightly more west than the Gas trap to ensure that any gassed mobs (especially Sharkens) are taking fire damage.
1st Combat Wave
- Have just your Adept upper out and then go counterclockwise, upgrading the traps area first, then Hint 4, Hint 3's area, and then rest at Hint 1. Aim at the spawns for the easiest time with upgrading, but make sure to be out of reach of the Harbingers.
2nd Combat Wave
- Have all characters/splits spawned in except for Hint 1's Summoner.
- To speed things along, start the wave without placing the characters at their spots yet.
- Starting with the Warden, quickly throw all the spawned splits off the railing towards Hint 5, so that the Harbinger that spawns at the beginning of the wave doesn't kill them.
- Place the Summoners at their Hint 3 and Hint 4 spots described above and shown below.
- Resume using your upgrader to finish up Hint 1. Just aim at the sky where the helicopter ogres are idling. Afterwards, give mana to your summoners so that they can heal their designated areas as needed for later waves. Once done, you can then just idle the wave away on the railing by the forge or go around opening chests.
- After the wave, drop mana, switch to the 3rd Summoner, and place this Summoner at Hint 1.
Overall Placement

Hint 2's Positions Shown at a Better Angle

Hint 4's Sludge Launcher Orientation

Hint 4's Reflect Beam Off-Set Position
