


Quickly test tower tweaks directly in this build view. Changes are not saved.
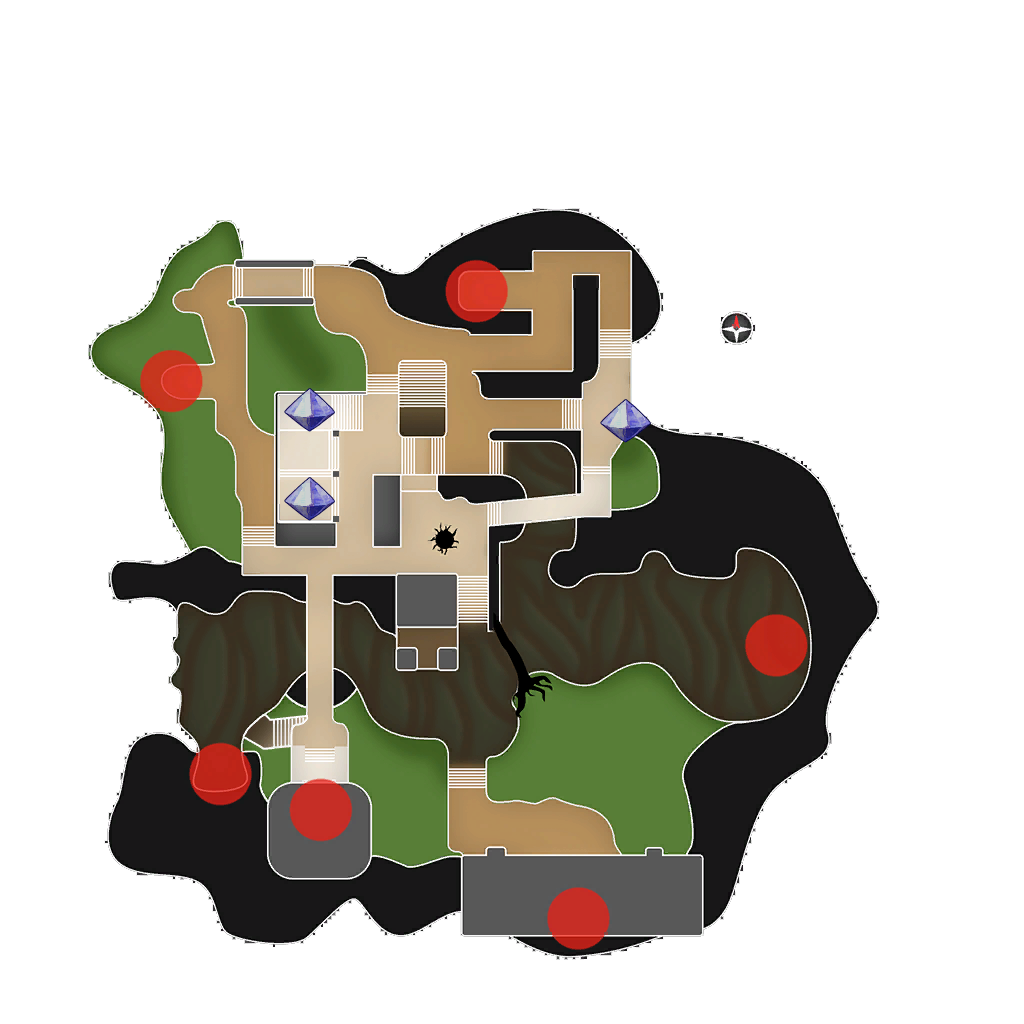
Click on a numbered hint marker on the map to zoom and highlight nearby towers. Double click on map to reset zoom.
No hint selected.
Highlight placed towers (Chrome limitation applies)


| Name | HP | Damage | Range | Rate |
|---|---|---|---|---|
 Monk Monk | - | - | 8100 | - |
 Hermit Hermit | - | - | 4600 | - |
 Warden Warden | 3500 | 8000 | 4500 | 4500 |
Build Status: Public
Difficulty: Any
Game Mode: Pure Strategy
AFK Able: No
Mana Used: 0
Mana to Upgrade: 0
More Builds from Sleepy
Actual DU used is 84 out of 85. Unlike a lot of other maps, for this map the third towers do not incur the +3 DU cost.
You'll have out two Summoners equipped with the Apprentice/Huntress guardian pets combo, a Tower Booster, and a builder Warden.
Towers are shown in the approximate orientation that they should be in. It's a fairly simple setup.
Hint 1:
- Build these after building the auras first.
- Upgrade the Nature Pylon to the max before building the rest of the towers so that the Forest Golem placement shows the exact range that the other towers can be built while being protected.
Hint 2:
- Place a Summoner with an Apprentice and Huntress guardian pet so that it buffs all of the Hint 2 Towers.
- The Cloud Towers are built so that they start on the tip of the stair "siding" (see picture below).
- These two Cloud Towers are the only towers that are fine to stack.
- The Wisp Dens should be built separately, so they can cover more lines of sight. It seems like a small difference, but it helps a lot. The wave to go by faster and they will reliably kill the spider that spawns north of Hint 2.
- Add a reflect beam protecting the towers from the south ogre balls if your Warden's tower health is too low.
Hint 3:
- This Cloud Tower takes care of the northeast mobs and northeast wyverns while aggroing the northeast ogres. It also helps a bit with the late wave Djinn flood.
- If your stats are high enough, you can angle it more to the east to help with the eastern mobs.
Hint 4:
- Place a Summoner with an Apprentice and Huntress guardian pet so that it buffs all of the Hint 3, Hint 4, and Hint 5 Towers. This is usually just south of and hugging the Hint 4 Tower.
- I like to place my Tower Booster from behind/north of Hint 4, and aim south above the bridge and in between the eastern and southern most spawn points, but mostly towards the eastern spawn point. If you angle it just right, the Tower Boost will last the entire wave.
Hint 5:
- This Shroom Pit helps Hint 3's Cloud Tower with the northeast mobs.
The main issue with this build is having to manually get the stuck Djinns out of the southern most spawn point or just wait them to automatically die during the later waves. I haven't figured out how to position the towers and characters so that the Djinns don't get stuck without needing to coax them out. If you take care of the Djinns being stuck before they slow things down, then the combat times are fairly fast; Wave 32 is under 2 minutes without upgrading towers, and Wave 35 is under 3 minutes without upgrading towers.
If you are struggling with having the Tower Boost last the entire wave, you can substitute the Hint 4 Summoner with a back up Tower Booster to alternate with. If you do substitute, then get rid of the Angry Blossom pointed east, build a buff beam on Hint 3 going north, and place Hint 5's towers on the most northern part of the beam.
Picture of the main part of the build (placement of some towers in the picture are off from the build as placement isn't super important for some of the towers):

Placement of western auras:
