


Quickly test tower tweaks directly in this build view. Changes are not saved.
Click on a numbered hint marker on the map to zoom and highlight nearby towers. Double click on map to reset zoom.
No hint selected.
Highlight placed towers (Chrome limitation applies)


Build Status: Public
Difficulty: Ruthless
Game Mode: Campaign
Hardcore: No
Ruthless: Yes
AFK Able: No
Mana Used: 0
Mana to Upgrade: 0
More Builds from Sleepy
Use this build because you want the perfect Shambhala Ley Staff for some odd reason. Combat each wave typically lasts around 1 to 2 minutes on average, depending on your RNG luck. The biggest wall for using this build is having 4 non-elemental damage DPS pets and gear/characters to attach them to.
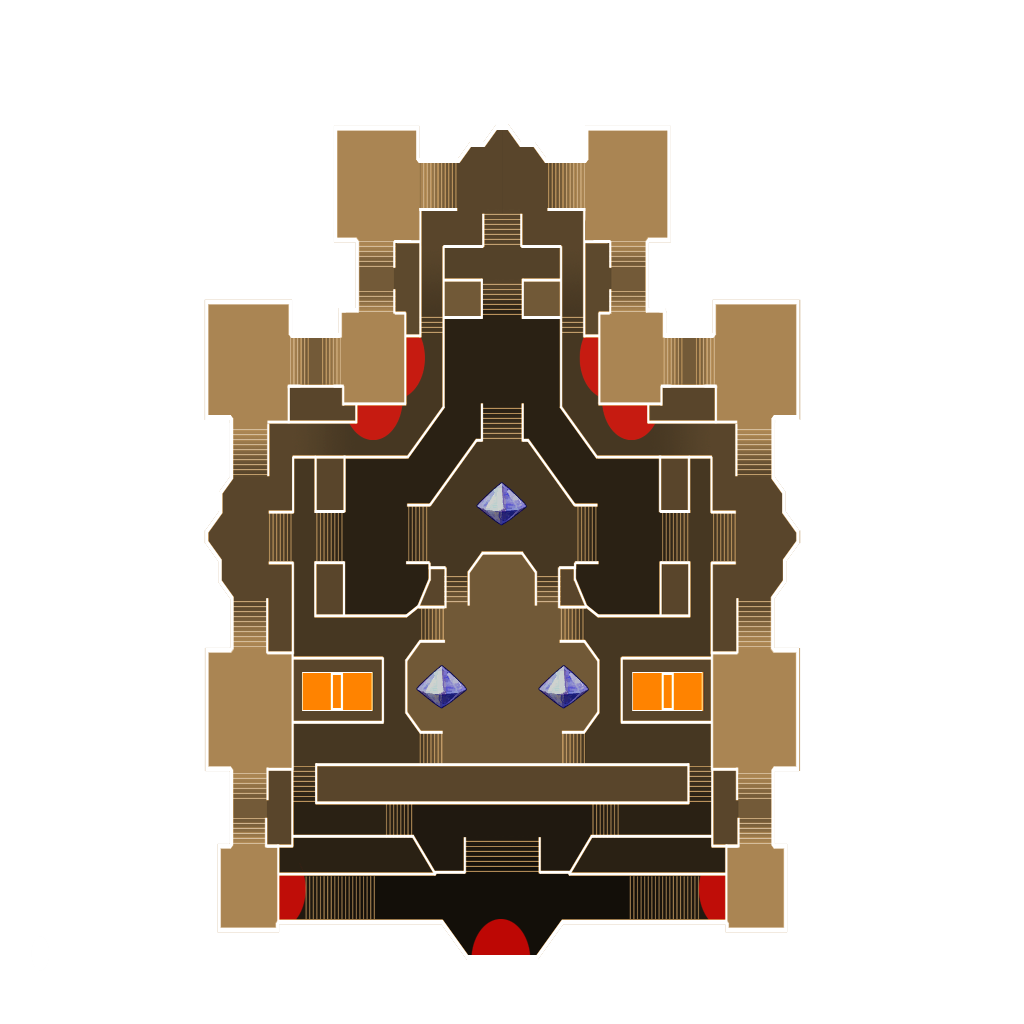
Hint 4 are spots for all DPS characters holding damage pets that do neutral/physical type damage. If they can't do enough damage so that the mobs are hurting them, then you'll need to equip a healing damage pet such as a goblin or owl. I've tested this build with non-healing and healing pets.
- South side, the Golden Mana Token will roll down the steps to your characters at the bottom of the steps.
- North side, your characters will be close enough to have the Mana Token roll up the slope to them, but yet far enough that they get some spacing for safety and allow the mobs to leave their invulnerability area.
- You don't want your north characters on the ground or directly south of the spawn. The Mana Token can sometimes behave oddly by sinking into the ground or getting caught in the perfect angle on random things that it won't reach your character if they are in those positions. Also the gold archer mobs that spawn may not come out of spawn, making the mana token they provide impossible to AFK farm.
1st Build Phase
- Build the Shroom Pits, Cloud Towers, and the three Hint 2 DSTs.
- I like building on top of the forge since I don't have to move.
- Have the 4 DPS out prior to starting the first wave.
- The DPS you control on the main screen should be one of the faster ones as you'll be moving around with them during the first wave.
First Wave
- Move the 3 DPS splits to the separate Hint 4 spots, starting with the south ones first.
- The south side characters should be your weaker damage characters.
- The north side characters should be your stronger damage characters. I recommend not using knockback pets for these north characters.
- The DPS you control will be assigned to either of the north Hint 4 spots.
- After gathering 700 mana, upgrade the buff beam 3 times. Head south and have the characters there drop mana for your person. With full mana, finish upgrading the buff beam. Then go to the north character you aren't controlling and have them drop mana for you. If the wave hasn't completed yet and you have 1500 mana, then go to the empty north Hint 4 spot and idle there until the wave is done.
2nd Build Phase
- Build the Hint 3 DSTs. Just sloppily spam them evenly to be slightly angled to the west and east, but mostly just pointing south. All towers should be built now.
- The main purpose of these DSTs is to get rid of the ogres. They also provide great support for the south characters in farming faster.
- Pull out your controlled DPS again.
Second Wave
- Park your controlled DPS in the empty north Hint 4 spot. Go take a 10 minute walk and come back to a completed run.
Extra notes
- If you are using a knockback pet (like an owl) on a north character, make sure they are hugging the south side of the pathway so that they don't accidentally knock the mobs they don't kill off the path.
- Don't upgrade the towers. Just upgrade the buff beam.
- Technically the auras and some of the towers facing towards the north are unnecessary, but I like having them there for insurance in case I do something stupid.
Times with AFKing:


If I wasn't AFK and was starting the next wave right away, then the total build time should display something like 2 minutes and 47 seconds with a total overall time of about 10 minutes and 18 seconds.
This is the positioning of the characters on the map:
