


Sandbox Mode
Quickly test tower tweaks directly in this build view. Changes are not saved.
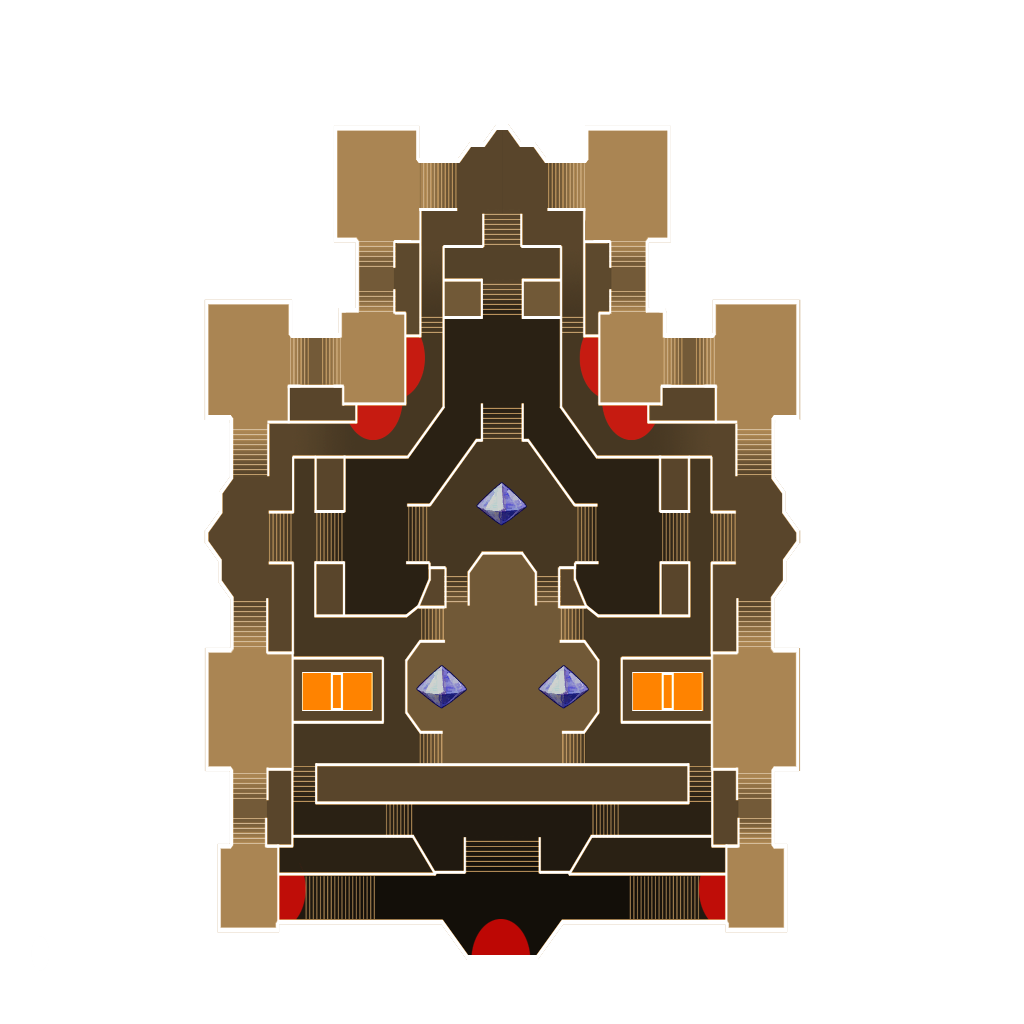
Hint focus
Click on a numbered hint marker on the map to zoom and highlight nearby towers. Double click on map to reset zoom.
No hint selected.
Tower Filters
Highlight placed towers (Chrome limitation applies)


Build Details
| Name | HP | Damage | Range | Rate |
|---|---|---|---|---|
 Apprentice Apprentice | - | 7900 | 4000 | 4200 |
 Monk Monk | - | - | 8100 | - |
 Warden Warden | - | 8000 | 4500 | 4500 |
Build Status: Public
Difficulty: Ruthless
Game Mode: Campaign
Hardcore: No
Ruthless: Yes
AFK Able: No
Mana Used: 0
Mana to Upgrade: 0
More Builds from Sleepy
Build Description
No DPS, because having to multi-task is annoying. I don't know the stats needed to pull this off. I just put my stats up for reference.
Initial Building
- Grab all the chests and build everything but the DSTs.
- The buff beam is placed so that it buffs the Strength Drain auras and the south Ensnare aura. This means the buff beam will buff only 3 of the 4 auras.
- The north Ensnare aura is placed further north enough on the top of the stairs so that the buff beam doesn't touch it.
- This allows the Ensnare aura to still protect the north crystal without affecting the spawn points. This allows the mobs to quickly exit the invulnerability area of the spawns so that the runs go faster.
- The north Ensnare aura is placed further north enough on the top of the stairs so that the buff beam doesn't touch it.
- The Reflect Beams are placed to make a square that is morphing into a triangle instead of a long rectangle as this will make it harder for the dragon to get fireballs in from a long angle. This means instead of all 3 stacks being built in a line, 2 of the stacks are adjacent to each other on the opposite sides of the line. So you'll have a triangle of stacks instead of a line of stacks.
First Wave
- Build DSTs during the wave. Hint 1 is built first, then Hint 2, and finally Hint 3. The order of the direction the DSTs are built is shown from left to right next to each hint. On the map above, the colors of the directional arrows match to the corresponding Hint's color.
- Build all of Hint 1 and part of Hint 2 before going to get more mana.
- Your App will need a mana generating pet or you will need to have your Upper out as a split to provide mana for your App.
- Hint 2 and Hint 3 DSTs that are pointed to the southeast and southwest are pointed a tad more to the east and west than to the south respectfully.
- Build all of Hint 1 and part of Hint 2 before going to get more mana.
- The buff beam is not upped until all the DSTs are built.
Second Wave onwards
- Take out your Tower Booster and finish upgrading the buff beam while boosting.
- Upgrading the DSTs aren't a priority, but upgrading will help speed things along.
Last Wave
- Take out the 3 characters you want to farm weapons for on your splits, and place them on separate tower stacks.
- Each character split must be equipped with a Guardian Huntress pet.
- When there are about 10 mobs left, turn off Tower Boost so that you will have it immediately available when the boss spawns.
- If there are a lot of ogres, then keep the Tower Boost on a bit longer. If there are few and/or weakened ogres left, then you can turn it off sooner. It will have to be a judgement call on your part.
- Just Tower Boost and chill through the Boss fight to win.
